> ## Documentation Index
> Fetch the complete documentation index at: https://docs.pricemedic.com/llms.txt
> Use this file to discover all available pages before exploring further.
# Payer Selection
> Select the payers to be included in the report
 ## Basics
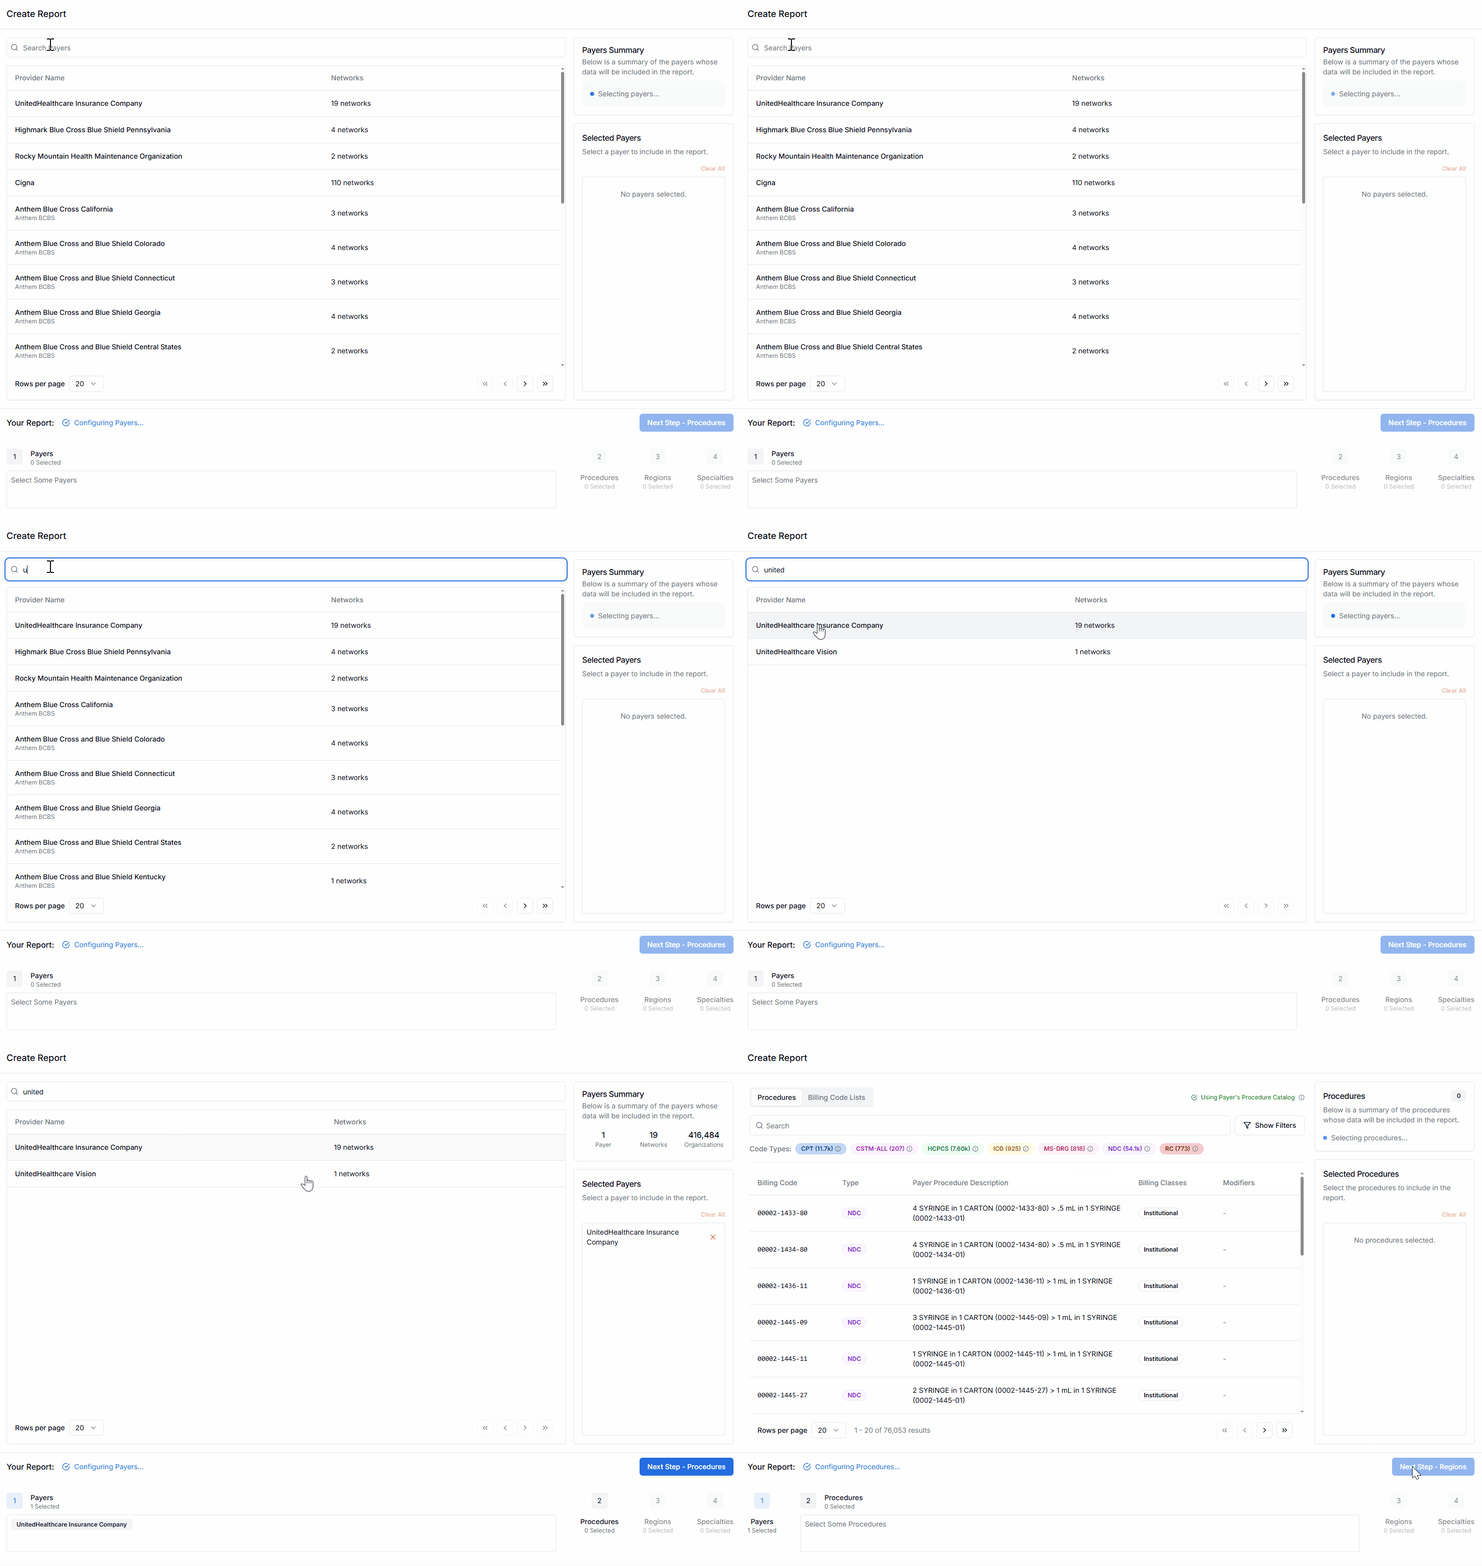
Select one or multiple payers whose reimbursement data you want to view through Reports.
View all the payers accessible to you using the scroll and paginate functions, or search by payer name.
Add a payer by clicking on its row in the table. It will now show up in the **Selected Payers** column along the right hand side of the screen. You can remove a payer by clicking the ❌ or **Clear All** within the Selected Payers Section along the right hand side.
The **Payers Summary Section** in the upper right hand corner will update to reflect the number of payers you have selected, the total number of networks associated with those payers, and the total number of contracted providers for which those payers have published reimbursement data.
If you cannot find a payer that you're looking for, reach out to your PriceMedic Account Executive.
Select **Next Step - Procedures** when you're ready to proceed.
## Tips & Tricks
* **For interactive analysis**: If you intend to view and interact with the data primarily using the PriceMedic Reports Portal and its native filter and analytics features, it's best to make reports for one payer at a time to maintain rapid interaction speed.
* **For data export**: If you intend to export the data for analysis in spreadsheet software, visualization tools like Power BI or Tableau, or for access by your development team, it can make sense to include multiple payers in a single report.
PriceMedic Reports supports report exports to CSV, but ensure whatever end analytics software you intend to use can support the export size. If your use case exceeds the sizing practical for CSV exports from Reports, reach out to your PriceMedic Account Executive to learn about our Data Shipping options.
Keep in mind that payers are listed according to the names of the network administering subsidiary rather than parent companies.
**Example**: Ambetter is listed, not Centene.
For each payer selected, all their network products are automatically added to the Report, with options in the Reports tool to filter down to the product level.
## Next Steps
Once you've selected your payers, proceed to [Procedure Selection](/guides/report-creation/02-procedure-selection) to choose the medical billing codes for your analysis.
## Basics
Select one or multiple payers whose reimbursement data you want to view through Reports.
View all the payers accessible to you using the scroll and paginate functions, or search by payer name.
Add a payer by clicking on its row in the table. It will now show up in the **Selected Payers** column along the right hand side of the screen. You can remove a payer by clicking the ❌ or **Clear All** within the Selected Payers Section along the right hand side.
The **Payers Summary Section** in the upper right hand corner will update to reflect the number of payers you have selected, the total number of networks associated with those payers, and the total number of contracted providers for which those payers have published reimbursement data.
If you cannot find a payer that you're looking for, reach out to your PriceMedic Account Executive.
Select **Next Step - Procedures** when you're ready to proceed.
## Tips & Tricks
* **For interactive analysis**: If you intend to view and interact with the data primarily using the PriceMedic Reports Portal and its native filter and analytics features, it's best to make reports for one payer at a time to maintain rapid interaction speed.
* **For data export**: If you intend to export the data for analysis in spreadsheet software, visualization tools like Power BI or Tableau, or for access by your development team, it can make sense to include multiple payers in a single report.
PriceMedic Reports supports report exports to CSV, but ensure whatever end analytics software you intend to use can support the export size. If your use case exceeds the sizing practical for CSV exports from Reports, reach out to your PriceMedic Account Executive to learn about our Data Shipping options.
Keep in mind that payers are listed according to the names of the network administering subsidiary rather than parent companies.
**Example**: Ambetter is listed, not Centene.
For each payer selected, all their network products are automatically added to the Report, with options in the Reports tool to filter down to the product level.
## Next Steps
Once you've selected your payers, proceed to [Procedure Selection](/guides/report-creation/02-procedure-selection) to choose the medical billing codes for your analysis.